Thursday, March 31, 2011

Blue Sparkle Star


FULL VIEW

This tutorial was written by Myrtle
on March 31st 2011

Was written in PSP 9
any verison will work fine

Any simularity to any other tutorial
is purely coincidental

The Ideas for this tutorial are my own
Do not claim as your own

Tools Needed

Scrap Kit
Mask
Tube
EyeCandy 4000
Xenofex2
Bordemenia Filter


Supplies

Scrap Kit Blue Star in Supplies

Mask WSL_Mask 143

HERE


Put Mask in your PSP Mask Folder

Open New Image 600X 600 Pixel Transparent
Fill with Color White
In Layer Palette find Raster 12 Paper From kit

Copy and Paste as New Layer
Layers Load/Save Mask
Load Mask From Disk
Find your Mask WSL_Mask 143

Source Lumiance Checked
Fit To Canvas Checked
Show All Mask Checked
Load
Merge Group

From Scrap kit find Raster Frame
Copy and Paste as New Layer
Image Roate 90 Degrees Right
Magic Wand Click inside Frame

Selections Modifty Expand 3
From kit Click on Raster 13 Paper

Copy and Paste as New Layer
Selections Invert Delete
Pull below Frame

Find your tube of Choice
I am using artwork from Barbara Jensen
to use her artwork you need a Lic#
HERE

Leave Selected
Copy and paste your tube of Choice
Resize 85 Percent
Selections Invert Delete
Pull below Frame
Selections Select None
Copy and Paste your tube again over that one
Layer Palette put Opacity on 75
With Eraser Tool erase all that hangs over frame

Give Drop Shadow

V&H 2
Opacity 55
Blur 5
Color Black
Click Ok

Click on Raster 3 Frame
Copy and Paste as New Layer
Image Rotate 90 Degrees Right
Give same Drop Shadow

Click on Raster 2 From kit
Copy and Paste as New Layer
Image Rotate 90 Degrees Right
Place over Frame

Click on Raster 6 Flower
Copy and Paste as New Layer
Resize 85 Percent Duplicate 2 times
Place like mine

Click on Raster 12 Paper
Copy and Paste as New Layer

Effects Bordermania Frame 2
Border Width 10
Frame Width 10
Bevel Checked
Click Ok

Give same Drop Shadow
Click on Raster 15 Bow
Copy and Paste as New Layer
Resize 85 Percent place left top
Drop Shadow

Click Raster 7
Copy and Paste as New Layer
place on top Bow

Click on Raster 14
Copy and Paste as New Layer
Place under Raster 11 on Bow

Click on Raster 13
Copy and Paste as New Layer

Place lower right corner
Duplicate Resize 75 Percent

Duplicate and place like mine in right lower corner

Add name and Copyrights
Font of Choice

EyeCandy 4000Gradient Glow on my Name

Glow Width 4.00
Soft Corners 25
Overall Opacity 100
Color White
Click Ok

Click on Background Layer fill with Color #8998e5
and give same bordermania
with Notched corners

Now to Animate

Alien Skin Xenofex2 Constellation

2.00-0-1-1-100-75 -45
Random Seed First layer 125
Click on Mask Layer and Star Frame Layers
Click Ok

Copy Merged

Animation Shope
Paste as New Animation

Back PSP
Edit Undo Constellation
same frame and mask layers

Effects
Xenofex2 Constellation
Same settings Click Random Seed
Click Ok

CopyMerged

Animation Shop
Paste After Currant Frame

Back PSP

Edit Undo Constellation

Same settings on Mask and Frame Layers
Click Random Seed

Click Ok

CopyMerged

Animation Shop
Paste After Currant Frame

View Animation if look ok resize and save as


Thanks for doing my tutorial

Hope you enjoyed doing my tutorial as much as I did writing it

♥ ♥ ~~~~~ Myrtle ~~~~♥ ♥


T

Tuesday, March 29, 2011

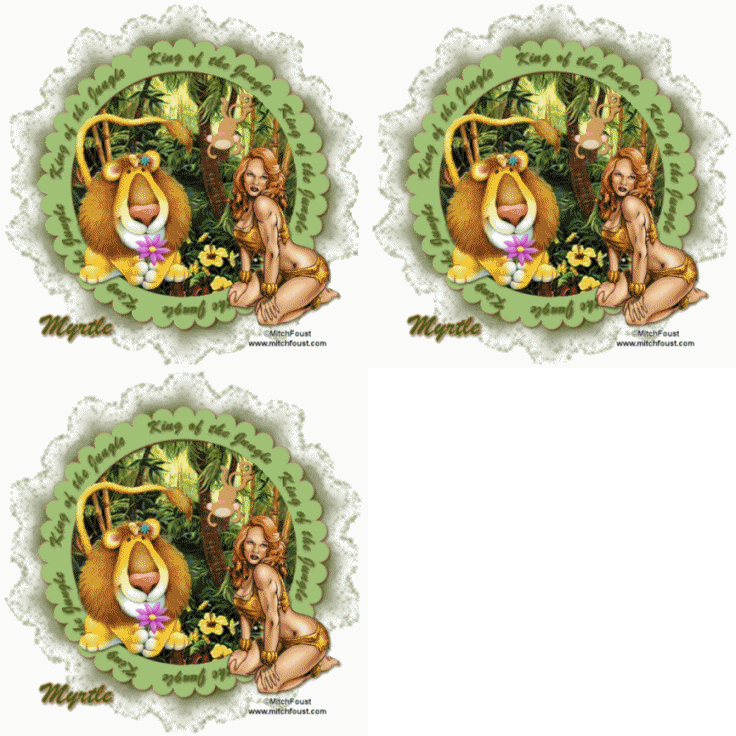
King Of The Jungle


This tutorial was rewritten by Myrtle

on March 30th 2011


Was written in PSP 9 any verison will work


Any simularity to any other tutorial is

purely coincidental


Ideas for this tutorial are my own

do not claim as your own


Tool Needed


Tube

Mask WSL_Mask 133

EyeCandy 4000

Alien Skin Xenofex2

SUPPLIES


I am decating this tutorial to

my good online friend Trish


Mask WSL_Mask 133


Save Mask to your PSP Mask Folder


Open New Canvas 600X600 Pixels Transparent

Fill with Color White


Layers New Raster Layer

Fill with Color #757c4e


Layers Load/Save Mask

Load Mask From Disk

Find WSL_Mask 133

Fit to Layer Checked

Source Luminance Checked

Hide All Mask Checked

Click Load


Supplies find Frame

Copy and Paste as New Layer

With Magic Wand Click Inside of Frame

Find your Jungle Tube from Supplies

Copy and paste as New Layer


Selections Invert Delete

Find King of the Jungle Text

Copy and Paste as New Layer

Place on the Frame


Find Lion from Supplies

Copy and Paste as New Layer

Place like mine so Look

like Lion is stepping over the Frame

give drop Shadow of Choice


Find the Monkey

Copy and Paste as New Layer

place like mine or where you like


Copy and Paste main tube

You can use mine or tube of choice


My Tube is by Mitch Foust and FTU


Add name and Copyrights

I used EyeCandy 4000 for Gradient Glow

on my name


Settings


Glow Width 3.00

Soft Corners 25

Overall Opacity 100

Draw Only Outside Selections Checked

Color#ebff64

Click Ok


Now Ready to Animate


Highlight Mask Layer

Effects

Alien Skin Xenofex2 Constellation


Star Size 3.00

Size Variation 25

Edge Star Density 25

Overall Star Density 25

Overdrive 45

Twinkle Amount 75

Twinkle Rotation 45

Keep Original Image Checked

Random Seed 1

Click Ok


CopyMerge


Animation Shop

Paste as New Animation

Back to PSP


Edit Undo Constelation


Effects Alien Skin Xenofex2 Constellation


Everything Same

Click Random Seed Once

Click Ok


CopyMerge

Animation Shop

Paste After Currant Frame


Back PSP


Edit Undo Constellations


Effects


Alin Skin Xenofex2 Constellations


Everything Same

Click Random Seed

Click Ok


CopyMerge


Animation Shop

Paste After Currant Frame


Click View Animation

if everything look ok

Resize 80 Percent or as you want size


Thanks for doing my tutorial

Hope you enjoyed doing my tutorial as much as I did

writing it..


♥♥ ~~~~~ Myrtle ~~~~~ ♥♥


Wednesday, March 9, 2011

Bro-ken


FULL VIEW

This tutorial was written by Myrtle
was written on March 16th 2011

Was written in PSP 9 any verison will work fine

Any simularity to any other tutorial
is purely coincidental

The Ideas for this tutorial are my own
Do not claim as your own

Tools Needed

Scrap Kit
Tube
Mask
EyeCandy 4000

Scrap Kit Broken Destiny by Jessica

HERE

Mask WSL_Mask 84 by weescotslasscreations

HERE

Tube of Choice
I am using artwork by Barbara Jensen
.
HERE

File Image New Image 600 X 600 Pixels

Open Scrap Kit Frame3 Copy and Paste
as New Layer

With Magic Wand Click inside of Frame 3
Selections Modifty Expand 6

Scrap Kit Paper 13 Resize 80 Percent
Edit Copy and Paste as New layer
Selections Invert Delete
Move Paper under Frame3

Find your tube of choice
If using same tube as I am
you will need a Licnese #

HERE


Copy and Paste as New Layer

Image mirror Resize 80 Percent place like mine

Layer Palette Lower Opacity 84 Percent
With Freehand Tool go around Part
hanging over Frame 3 Hit Delete Button on Keyboard
Selections Select none

Layer Palette put Opcity back to 100 Percent

Scrap Kit Paper 23 Copy and Paste as New Layer

Layers Load/Save Mask
Load Mask From Disk

Source Luminance Checked
Fit To Canvas Checked
Hide All Mask Checked
Click Load
Merge Group

Scrap Kit Element Doodle 1
Resize 65 Percent
Copy and Paste as New Layer
Image Rotate Place like mine

Scrap Kit Element Butterfly4
Resize 65 Percent 2 times
Copy and Paste as New Layer
Place like mine Rotate like mine
Drop Shadow Duplicate and Mirror
Place like mine

Give all Layers Drop Shadow

Add your name and copyrights
I put Gradient Glow on my name

Eye Candy4000
Glow Width 3.00
Soft Corners 25
Overall Opacity 100
Draw Only Outside Selections Checked
Color White
Click Ok

Put your name on the tag
Font of choice

Layer Palette Merge All Flatten
Resize and Save As 80 Percent

Thanks for doing my tutorial
Hope you enjoyed doing my tutorial
as much as I did writing it

♥♥~~~~~ Myrtle ~~~~~ ♥♥


Saturday, March 5, 2011

Spring Flowers


FULL VIEW


This tutorial was written by Myrtle
on March 8th 2011


Was written in PSP 9
Any verison should work fine


Any simularity to any other tutorial
is purely coincidental


The Ideas for this tutorial are my own
Do not claim as your own


Tools Needed

Scrap Kit
Tube
Mask
EyeCandy 4000
VanDerLee Filter Snowflakes
Graphic Plus Cross Shadow


Scrap Kit by scrapsbyjessica


Tube of Choice I am using artwork by Keith Garvey

Mask WSL_Mask 84 by weescotslass
Ok lets get started
Open New Image from File
600 X600 Pixels
Scrap kit Frame 4 Copy and Paste
as New Layer
With Magic Wand click inside Frame
Selections Modfity Expand 6
Scrap Kit Paper 6 Copy and Paste
as New Layer Resize 65 percent 2 Times
Selections Invert Delete
Keep Selected find your tube
If using same tube as I am you will need
a Licesne #
Copy and Paste as New Layer
Resize 80 Percent
Selections Invert Delete
Selections Select None
Scrap Kit Paper 25
Copy and Paste as New Layer
Layers Load/Save Mask
Load Mask From Disk
Find Mask WSL_Mask 84
Source Luminace Checked
Fit to Canvas Checked
Hide All Mask Checked
Click Ok
Load MergeGroup
With Deformation Tool Pull Mask
Layer out on all sides some
Click on Background Layer from Layer Palette
Color Palette Color White Fill Layer
Template Cherokee find the Diamond Line
Copy and Paste as New Layer
Above Mask Layer
Selections Select All New Raster Layer
fill with Color #b2c0cc
Click Ok
Fill Diamond Line
Effects Graphic Plus Filter Cross Shadow
Default Settings
Selections Select None
Delete the Diamond Line
Scrap Kit Element Butterfly2
Copy and Paste as New Layer
Resize 65 Percent 2 Times
With Deformation Tool Rotate
Look at mine Drop Shadow
Scrap Kit Element Watering can Resize 65 Percent 2 Times
Copy and Paste as New Layer
Place like mine
Scrap Kit Tulip 4 Copy and Paste
as New Layer Resize 65 Percent 3 Times Drop Shadow
Layer Palatte Duplaicte and Place like mine
Scrap Kit Tulip 5 Copy and Paste
as New Layer Resize 65 Percent 3 Times
Place like mine Drop Shadow
Duplicate and Place like mine
Add your name and copyrights
I put Gradient Glow on my name
Effects EyeCandy 4000
Gradient Glow
Settings
Glow Width 3.00
Soft Corners 25
Overall Opacity 100
Draw Only Outside Selections Checked
Color White
Click Ok
With Freehand Tool Draw from wate can spout
to around Tulips Layers New Raster Layer
Rename Rain
Now We are Ready to Animate
Effects VanDerLee Snowflakes
Settings
Amount 250
Mimimum Size 0
Maximum Size 20
Hardness 100
Transparency 0
Snow Color Basic White
Ramond Seed 0
Click Ok
Ajust
Blur
Motion Blur
Angle 167
Strenght 30
Click Ok
Selections Select None
CopyMerge
Animation Shop
Paste as New Animation
Back PSP Edit Undo Selections
Undo Blur
Edit Undo Snowflakes
Effects
VanDerLee Snowflakes
Same Settings Move Random Seed a Little
Ajust Blur Motion Blur
Same Settings
Click Ok
CopyMerge
Animation Shop
Paste After Currant Frame
Back PSP
Edit Undo Selections
Edit Undo Blur
Edit Undo Snowflakes
Effects
VanDerLee Snowflakes
Same Settings
Move Random Seed a little
CopyMerge
Animation Shop
Paste After Currant Frame
View Animation If look ok
Resize and Save as Gif
Thanks for doing my tutorial
Hope you enjoyed doing my tutorial as I did writing it
♥~~~~~Myrtle ~~~~~♥


Tuesday, March 1, 2011

Aged Rain


Full VIEW

This tutorial was written by Myrtle
On March 2 2011

Was written in PSP 9
Any verison will work

Any simularity to any other tutorial
is purely coincidental

The Ideas for this tutorial are my own
Don not claim as your own

Tools Needed

Scrap Kit
Tube
Image of Choice or mine in Supplies
Plug ins Filters
VanSerLee Snowflakes

Scrap Kit by Lisa Encircled
HERE
Go to Scrap Kits on Right side of blog
click Here

Tube of Choice
I am using art work by Barbara Jensen
HERE

A sitting up tube works better for this tutorial
Image HERE

Lets get started

Supplies at the bottom of Page

File New Image 600X600

Scrap Kit Paper 1
Copy and Paste as New Layer

Find your image from supplies
Copy and Paste as New Layer

Scrap Kit Element Swag1
Copy and Paste as New Layer
Resize 80 Percent
With Freehand Tool circle part
from hanger cut all of Swag off
Duplicate Mirror look at mine

With Preshape Tool Rectangle
Draw out a narrow Rectangle
in Color # 6398a5 look at mine
Draw from hanger to hanger centers
Layers Convert to Raster Layer

Effects 3D Effects Inner Bevel

Settings
Bevel 2
Width 14
Smoothness 16
Depth 4
Ambience 0
Shininess 0
Angle 315
Intensity 50
Elevation 30
Color White
Click Ok

Layer palette MergeDown
The Swags and Rod you just made

Scrap Kit Element Flower 6
Resize 65 Percent Place Place under sitting tube

Scrap Kit Element Butterfly 2
Resize 65 Percent Place like mine
With Deformation Tool Rotate like mine

Add your Name and Copyrights and License#

I used Gradient Glow on my name

Eye Candy 4000 Gradient Glow

Glow Width 4.00
Soft Corners 25
Overall Opacity 100
Draw Only Outside Selections Checked
Color White
Click Ok

Ready to Animate

Layer Palette Click on Image Layer
With Freehand Tool Go to your Image
Draw a large Rectangle over Image
Layers New Raster Layer
Name this Layer Rain
Place this Layer over Image Layer

Effects Vanderlee Snowflakes

Settings

Amount 250
Mimimum Size 0
Maximuim Size 6
Hardness 100
Transparency 0
Snow Color ( Basic Black)
Random Seed 0
Click Ok

Adjust
Blur
Motion Blur
Angle 167
Strenght 30
Click Ok
CopyMerge

Animation Shop
Paste as New Animation

Back to PSP
Edit undo Blur
Undo Snowflakes

Effects Snowflakes
Same Settings
Move Random Seed a little
Click Ok
CopyMerge

Animation Shop
Paste After Currant Frame

Back PSP
Edit Undo Blur
Undo Snowflakes

Effects Snowflakes
Same Settings
Move Random Seed a Little
Click Ok
CopyMerge

Animation Shop
Paste After Currant Frame

View Animation
If look ok Resize and Save as Gif


♥♥♥~~~♥♥♥

Thanks for doing my tutorial
Hope you enjoyed doing my tutorial
as much as I did writing it
♥♥~~~~~Myrtle~~~~~♥♥