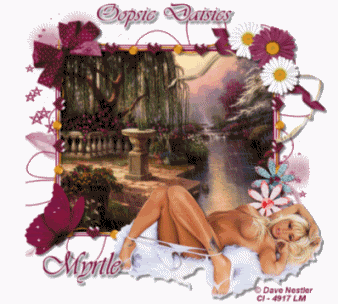
Friday, November 28, 2008

Treasured Friends Award


I am so honored to have received my 1st award for this blog
by the ever so Talented Lady MZ Jen ~
Thank you xxxxxxx

I pass this Award onto 5 Beautiful Talented Ladies
Uniquescrapz
scrapsbyjessica
designsbyali

Wednesday, November 26, 2008

French Harlem


French Harlem

This tutorial was written by Myrtle on November 26 th 2008
Any simularity to any other tutorial is purely coincidental
and was written in PSP 9 any verison should work

Tools Needed

Tubes
Scrap Kit
Template10
Eyecandy 4000
DSB Flux

Scrap Kit French Harlem HERE

Template 10 HERE

Open template 10 selections select all selections float selections defloat
on first strip of template 10 Find paper 5 from kit
copy and paste as new layer
selections invert delete selections select none
With deformation tool pull paper to edges of strip
give drop shadow of choice
click on second strip of template
selections select all selections float selections defloat
Find paper red from kit copy and paste as new layer
selections invert delete selections select none
Deformation tool pull paper to edges
give drop shadow
click on 3rd strip of template selections select all selections float defloat
copy and paste paper 5 as new layer
selections invert delete selections select none
deformation tool pull paper to ends
drop shadow
click 4th strip of template selections select all float defloat
copy and paste red paper as new layer
selections invert delete selections select none
drop shadow
now do bottom strip of template
with paper 5 same as other strips
Click on black ratangle selections select all float defloat
copy and paste paper 3 as new layer
pull paper over so some of the design is showing on retangle
selections invert delete drop shadow
Find frame 2 oval copy and paste over first oval frame of template
resize 80 percent 4 times
and with deformation tool pull to fit layer
drop shadow and dupicate and place over other template frame
Find your main tubes
I am using Terry's tubes FTU tubes
with magic wand click inside of first frame
leave the black oval of template and resize your tube
80 percent 2 times copy and paste as new layer
do this on both frames and tubes drop shadow both frames
and use elements of choice or like mine
Find the roses and with magic wand click inside the vine
and layers new raster layer and fill with color #416552
and find the red roses and yellow flowers
click on the grey strip of template
Find flat ribbon 1 rotate 90 degrees right
copy and paste as new layer
Selections invert delete Selections select none
delete the grey strip template layer
Add your name and copyrights
add gradient glow to your name if you want..
Close off all layers except the 2 red strips merge visible
Open all layers back and click on merged red layer
and Effects DSB Flux bright noise
density 35
mix 1 time click ok
animation shop paste as new animation
back to PSP
edit undo bright noise
Effects DSB Flux bright noise mix 2 times click ok
copy merge animation shop paste after current frame
back to PSP edit undo bright noise effects
DSB Flux bright noise
mix 3 times click ok
animation shop paste after current frame ..
view animation if look ok save as and resize
Thanks for doing my tutorial
Leave a finished tag url and I will post on my blog
Registered with TWInc
Myrtle

Sunday, November 23, 2008

Merry Christmas

Merry Christmas

This tutorial was written by Myrtle on November 23rd 2008
Any simularity to any other tutorial is purely coincidental
And was written in PSP 9 any verison will work

Tools Needed
Tubes
Scrap Kit
Template 93
Eyecandy 4000
Mura's Meister

SUPPLIES

Template 93 by Dezignsbyali HERE

Scrap Kit Victorian Christmas HERE

Open Template 93 go to layer raster 2 click on it with magic wand
Layers raster layer fill with color white
with selections tool draw from top to half way of layer
Effects Mura's Meister cloud
Effect 100
amount 100
gain 3
contrast 0
bias 0
light 0
cubic 0
blur 0
contour 0
blend mode preset menu
reset colors 3 black checked white black white click ok
Click on layers raster 4 of template
click on frame with magic wamd
fill with color white
3 D effects bevel of choice then give drop shadow of choice
copy and paste the winter tube image as new layer
selections invert delete
Find window from kit and trim out the panes with freehand tool
resize 80 percent
copy and paste as new layer over the winter image
with deformation tool pull and stretch till all sides and top
are covered with window
then click on image frame and delete template
Do frame corners same way..
From kit find valance resize 80 percent 4 times
place on window like mine
With freehand tool trim off parts of valance hanging over window
give drop shadow of choice
Find Christmas tree in kit copy and paste as new layer
resize 80 percent
delete tree template layer
Find the chair in kit and resize 80 percent
and place in front of window
drop shadow
Click on raster 1 in template
find paper 1 from kit and with magic wand click inside raster 1
copy and paste paper as new layer
with deformation tool pull paper to edges of raster 1
give drop shadow
Find grandmas frame from kit resize 5 times 80 percent
place on raster 1 of template as new layer
Find paper 2 from kit resize 80 percent 5 times
copy and paste as new layer selections invert delete
Find your main tube of choice
I am using the artwork of Keith Garvey
to use his artwork you need a license
resize 80 percent
copy and paste as new layer
selections invert delete and pull below frame
now copy and paste same tube and place by Christmas tree
give drop shadow
Layers new raster layer fill color white
move to bottom of layer pallete
Find stocking resize 80 percent 6 times
place in front of chair and give drop shadow
Place elements of choice or use mine..
I used elements from different scrap kits
Add name and copyrights
Layers close off window,valance,red flower, chair,stocking,pingium
and merge visible rest of layers
Copy merge Animation Shop paste as new animation
Find snow animation gif from supplies
resize until fit image
paste frame until you have 10 frames
go to snow animation gif and select all frames
and back on main frames select all
now drag snow over image
View snow and it is snowing
Back to PSP and close off all layers that are open
and undo rest of layers
and copy merge Animation Shop Paste as new animation
paste until you have 10 frames
Edit select all and on other 10 frames
edit select all and on other 10 frames
drag on to main frames and line them up
with the window over the snow image
then let go of mouse
View if look ok resize and save as
Thanks for doing my tutorial
Registered with TWInc
Myrtle


Friday, November 7, 2008

Tis The Season


Tis the Season

This tutorial was written by Myrtle on November 7 th 2008
Any simularity to any other tutorial is purely coincidental
and was written in psp 9 any verison will work

Tools Needed

Scrap Kit
Template 8 by ali HERE
Eyecandy 4000
Tube winter image

Supplies

Open the template layers new raster layer fill with white color
with magic wand click inside black areas
selections modity expand 2
Find paper 2 from kit copy and paste as new layer
selections invert delete selections select none
With freehand tool draw around the triangles
Effects texture effects weave
Gap size 25 width 5 Opacity 20 weave and gap color green fill gaps checked
Resize template 85 percent
with magic wand click inside of center square of template
selections modity expand 2
find your winter image of choice
copy and paste as new layer selections invert delete
move below center frame selections select none
Add elements of choice resize and drop shadow them
Place your tube of choice
I am using the artwork of Keith Garvey
to use his artwork you need a license
Add copy right and name
I used Eyecandy gradient glow to my name
Close all layers except template image text
and copy right copy merge and go to Animation Shop paste as new animation
Paste until you have 5 frames
Find your snow gif resize until fit inside of image
Edit select all and edit select all on frames
click on snow and drag it over the winter image
and when it is right over the image drop mouse
and view animation and if look ok
then back to psp open all layers
close off background ,template layer if look ok then back to psp
Open all layers and close off background template
copy merge layers Animation Shop paste as new layer
paste until you have 5 frames
Edit select all on frames and then edit select all on the snow frames
and drag the other frames
View Animation if look ok then resize your gif
and save as drop shadow on all things that need a shadow
and save as gif
thanks for doing my tutorial
Registered with TWIc
Myrtle

Thursday, November 6, 2008

Rocking Hot


This tutorial was written by Myrtle
On 10th June 2008 was written in psp9
Any similarity to any other tutorial is purely coincidental

Tools needed
Tube
Mask
Scrap-kit

Plugin DSB Flux

WSL_Mask 38 HERE
Scrap kit by kopperhead HERE


I am using the beauiful artwork of Scott Blair you must have a licence to use his artwork.

No supplies need for this tutorial

Open new canvas 600X600 white
Paper 01- resize 50 percent 2 times all layers checked, copy and paste as new layer, resize 80 percent all layers unchecked

layers load mask from disk WSL_Mask 38 source luminance checked, -fit to layer checked , show all mask checked click load , layer palette delete mask, merge group.

Find gold star resize 80 percent all layers unchecked, copy and paste as new layer

Resize on 80 percent 3 times, deform tool rotate till point is centered.

Color pallete change background color to blue,

Adjust Hue-150- Sat - 168 click ok

Drop shadow starV-H -2 -Opacity 60-blur 4- color black and drop shadow V-H -2 - Opacity 60- blur 4- color black

.find the notebook from scrap kit, resize 55 percent,copy and paste as new layer.

Adjust colorize Hue - 255-Sat -32.

Write Tattoo-Rock on the page with calligrpher font or font of choice color black and angle text

Close all layers except for the book and text, merge visible

Turn layers back on and add drop shadow to book, V-H 2-Opacity 50-blur 4.00 ,black.

Add tube of choice,move to right, look at my image, if to big resize, give same drop shadow to tube.

Find the music notes in scrap kit resize 25 percent and copy and paste as new layer

Resize 25 percent place right top look at mine and if to big resize 30 percent

Find the emb 11 resize 25 percent copy and paste as new layer place upper left side..

Duplicate both note and emb 11 and put like mine..or how you like them.

Blue sparkles from scrap kit It's a girl thing or sparkles of choice , duplicate and flip to bottom and turn off all layers except for the sparkles merge visible and turn on all layers,

Now turn off all layers except for the music notes and emb 11 merge visible,

Turn all layers back on.

Add name and copyright . Crop extra white off.

Now we are ready to animate,

Effects dsb flux bright noise layer sparkles 45 mix 1 time ok.

Now music note layer effects dsb flux bright noise mix 1 time ok

And do the star layer the same dsb flux bright noise and mix 1 time.

. Copy merged

And go to AS paste as new animation.

Back to psp edit undo bright noise, edit undo bright noise, edit undo bright noise, go layer sparkle layer effects dsb flux bright noise, mix 2 times, note layer effects dsb flux bright noise 2 times, star layer effects dsb flux bright noise mix 2 times and copy merged

Go to AS paste after current frame

Back to psp edit undo bright noise, edit undo bright noise, edit undo bright noise. Sparkle layer effects dsb flux bright noise mix 3 times. Note layer effects dsb flux bright noise mix 3 times. Star layer, effects dsb flux , bright noise mix 3 times, copy merged

Go to AS paste after current frame

Resize 85 percent 2 times

View animation

If look ok then save as.

Thanks for doing my tutorial

Myrtle

Dazzle in Pink

This tutorial was written by Myrtle on June 12 th 2008 .

Any simuilarity to any other tutorial is purely coincindental and was written in PSP 9

Tools needed

Tube

Scrap kit

Mask

DSB Flux Filter

Scrap kit by Laura HERE
Called Delicate Delicate.. scroll back a ways to find in older post
Mask WSL_Mask 220
Put Mask WSL_Mask 220 in your psp mask folder

I am using tube from Barbara Jensen, her beauiful artwork is PTU, have to have a licence to use her artwork.

Open new canvas 600X 600 white.

Copy and paste paper 8 from the scrap kit as new layer.

Load the WSL_Mask 220 from disk

where you put your mask. ln folder merge group.

frame from scrap kit 4 copy and paste as new layer,

resize 85 percent,

drop shadow, H & V 4-4- 60-5 color same drop shadow with -4 H & V,

pink small ribbon from kit, copy and paste as new layer,

resize 55 percent, place over blue ribbon on flower on frame, with deformation tool pull ribbon until no blue is showing.

Drop shadow 4-4-60-5.

With magic wand click inside of frame selections modify expand by 4,

find paper 4 from kit resize paper 70 percent copy and paste as new layer, selections invert delete.

keep selections,

copy and paste your tube as new layer,

selection invert delete,

now copy and paste your tube as new layer,

with lasso tool circle the part from waist and hit delete.. look at mine.

Go to pretty butterfly, resize 3 times at 80 percent,

copy and paste as new layer,

place at right top of frame edge,

drop shadow, V & H 2- opacity 60- blur 3, color black,

duplicate and place at bottom left on edge of frame use deformation tool rotate till on edge of frame, look at mine.

Pink dragonfly from kit,

resize 3 times at 80 percent.

copy and paste as new layer and place top left on edge of frame, look at mine

deformation tool rotate.

Now for the text,

I used font Unicon, size 36, stroke 2, vector,foreground color blue from the butterfly and background pink from butterfly,

now write Dazzle In Pink, look at mine where I put text, convert to raster .

Add copyright and your name.

Close off all layers except butterflies, dragonfly,frame and text dazzle in pink,

merge visible these layers,

turn back on all layers.

Click on merged layer,

effects dsb flux filter, bright noise intensiy 42, mix 1-click ok,

copy merged,

AS paste as new animation.

Back to PSP and undo bright noise,

effects dsb flux bright noise, mix 2 times click ok

AS paste after curent frame.

Back to PSP undo bright noise,

effects, dsb flux bright noise mix 3 times click ok, copy merged.

AS paste after current frame,

resize 85 percent 2 times,

view animation ,

crop tool and crop off extra white and save as.

Thanks for doing my tutorial Myrtle

Wednesday, November 5, 2008

ENCIRCLED


Encircled

This tutorial was written by Myrtle on July 4th 2008
Any simularity to any other tutorial is purely coincidental
and was written in PSP 9 any verison will work

Tools needed

Scrap Kit
Mask
Alien Skin plugin

Scrap Kit by Lisa HERE
go to My Kits and click Here and go to encircled
on her download list

Encircled-freebieThanks Lisa

Mask from WSL_Mask 183 HERE

I am using the Beauiful artwork of Barbara Jensen
you must have a license to use her artwork

no supplies for this tutorial

Open new canvas 600 X 600 white
Open paper 3 from the kit copy and paste as new layer
layers load from disk WSL_Mask183 load
merge group.
Find swag 2 from kit copy and paste as new layer
resize 85 percent with deformation tool,
pull sides to edge of mask layer rotate a little to right.
Give swag drop shadow
V & H 2
opacity 80
blur 5.00
color black
copy and paste your tube,
laying down tube works better,
colorize to mack swag color
if using laying down tube put under swag
and copy and paste tube again over top of first tube
and lower the opacity
and with freehand tool go around parts that are hanging over the swag
delete
put opacity back to 100
mask layer highlight
and find brad 3 in kit copy and paste as new layer.
resize 80 percent place brad under tube
on mask layer go to Effects Mura's Meister copies
number 12
circle tile mode
behind and encircle click ok.
With deformation tool pull the circle out to look like mine
find butterfly 1 copy and paste as new layer
resize 80 percent 2 times
place bottom left rotate with deformation tool
right and give same drop shadow and place like mine
Find flower 3 copy and paste as new layer
resize 80 percent 2 times
place on bottom right
give same drop shadow..
put copyright and name
give same drop shadow..
give brad layer drop shadow..
close off both tube layers and swag layer.
on bead layer with freehand tool
go around center of the brads and go to
effects Alien Skin constellation
Star size 5.51
Size Variation 50
Edge star density 50
Overall star density 25
Overdrive 50
Twinkle Amount 75
Twinkle Rotation 45
Keep original image checked
Random seed click 1 time ok
Selections select none
copy merge AS paste as new animation
back to PSP Edit undo select none edit undo constellation
Effects Alien Skin constellation
same settings click random seed ok.
Selections select none
copy merge AS paste after current frame
Back to PSP undo select none undo constellation
Effects Alien Skin constellation same settings
click random seed 1 time ok
copy merge AS paste after current frame
Resize 85 percent 2 times
View animation if look ok save as
Thanks for doing my tutorial
leave a finished tag on my picture album
Registered with TWInc
Myrtle

Sunflower Dreams


Sunflower Dreams

This tutorial was written by Myrtle on July 5th 2008
Any simularity to any other turorial is purely coincidental
and was written in PSP 9 can be done in any verison

Tools needed

Scrap Kit
Mask
Alien Skin Plugin
Eyecandy 4000

WSL_Mask 143 HERE
Save mask to psp mask folder

Scrap Kit- ScrappinMommy Creations HERE

This scrap kit from scrappinMommy Creations is no longer there
Use any scrapkit that has sunflowers in it..

I am using a tube from Jessica Dougherty
to use her artwork you have to have a license

No supplies for this tutorial
Open new canvas 600 X 600 white
Open paper 3 from kit,resize 85 percent,
copy and paste as new layer,
layers load from disk WSL_Mask 143 load
merge group.
Find sunflower frame copy and paste as new layer,
image resize 85 percent,
with magic wand click inside of frame
selections modity expand 8.
Find glass filled sunflower 2
copy and paste as new layer,
selections invert delete ..
pull below frame layer
selections select none.
With deformation tool
pull a litte at top until not showing edges..
hight light mask layer with deformation tool
pull out a little on all sides.
Find tube and copy and paste as new layer
resize 85 percent and place to right of frame,
give drop shadow
V & H 2
opacity 80
blur 5
color black
give frame same drop shadow,
find butterfly 4 resize 85 percent
copy and paste as new layer
resize 70 percent 2 times.
Image rotate 30 left
place on frame and give same drop shadow.
Find bow 1 copy and paste as new layer
and give same drop shadow.
and place at top of frame.
If using same tube I am,
with freehand tool go around one of the sunflowers
on the tube and copy and paste like mine.
Add copyright and name
I used font Tristan from psp fonts
size 48 stroke 3 vector, color #dAAB2D
layers convert to raster layer ,
with magic wand click inside of the letters
find sunflower 2 copy and paste into selections ..
Effects Eyecandy 4000 glass
colorDAAB2D ..
Eyecandy 4000 gradient glow width 3.00
soft corners 25
Overall opacity 100
Draw only outside selection checked
Color #C37C13
give same drop shadow
Effects Alien Skin Xenofex 2 consellation
5.00 9 3 9 100 55 45
Keep original image checked
Random seed click 1 time click ok
Copy merge
AS paste as new animation,
back to PSP Edit undo consellation.
Effects Alien Skin Xenofex 2
click random seed 1 time click ok.
copy merge A S paste after current frame
Back to PSP Edit undo consellation,
Effects Alien Skin Xenofex 2 consellation
click random seed 1 time click ok.
Copy merge A S paste after current frame
and resize 85 percent 3 times.
view animation if look ok save as.
Thanks for doing my tutorial
Leave a finished tag on my picture album
Registered with TWInc,
Myrtle

I Love Denim


I Love Denim

This tutorial was written by Myrtle on July 18th 2008
Any simularity to any other tutorial is purely coincidental
and was written in PSP 9 can be done in any PSP

Tools needed

Tube
Scrap Kit
Mask
DSB Flux
Eyecandy 4000

Scrapkit by Laura HERE full kit or freebie will do I am using full kit
Pretty Denim

Mask- WSL_Mask 4 HERE

save mask to psp mask folder

Open new canvas 600 X 600 fill with white
Open paper of choice copy and paste as new layer
resize 80 percent
Layers load mask from disk
source luminance checked
fit to layer checked
show all mask checked
load delete yes merge group
find lace copy and paste as new layer
resize 80 percent
give drop shadow
V & H 2
Opacity65
blur 3
color black
Copy and paste your frame 1 or of choice from kit
resize 80 percent
place over lace layer
with magic wand click inside of frame
selections modity expand 5
find paper of choice resize 80 percent 2 times
copy and paste as new layer
selections invert delete selections select none
move paper layer under frame
click inside of frame and selections modity expand 5
find your tube of choice
I am using a Terry tube copy and paste as new layer
invert delete selections select none
move tube below frame
edit and paste tube again over the first one
give same drop shadow
and with freehand tool circle the part hanging over frame
lower opacity to 80
trim over hanging put opacity back to 100
click on mask layer
and with deformation tool pull out a little
find flower resize 70 percent 2 times and place like mine
drop shadow and duplcaite 2 times
and place like mine
find silver button resize 70 percent 3 times
place one on hat if you using same tube as I am
and duplicate 2 times and place on flower centers
find glitter doodle and resize 70 percent 2 times
and place behind frame and paper layers
Find bow resize 70 percent 2 times
and place at top of frame
find butterfly and resize 70 percent 3 times
and with deformation tool rotate till like mine
Find I love denim tag and place over frame
resize 2 times 70 percent and drop shadow..
turn off all layers except doodles
merge visible
do the same with butterfly layers
and same with flower and buttons layers
put copyright and your name font of choice
I used Eyecandy 4000 gradient glow on my name
Glow width 3.00
Soft corners 25
Overall opacity 100
Draw outside of selections checked
Glow color white
I used a denim paper for pattern for my name text
give same drop shadow
now we are ready to animate
Effects DSB Flux Bright Noise
Intensity 25
Mix 1 time click OK
do this on mask layer butterfly and doodle layers
copy merge and Animation Shop paste as new animation
back to PSP and Edit undo bright noise on all 3 layers
Effects DSB Flux bright noise
mix 2 times on all 3 layers
copy merge and to Animation Shop and paste after current frame
back to PSP and Edit undo bright noise
Effects DSB Flux bright noise mix 3 times on all 3 layers
copy merge and Animation Shop paste after current frame
veiw animation and if look ok resize 2 times on 85 percent
Thanks for doing my tutorial
Leave a finished tag on my picture album
Registered with TWInc
Myrtle

Tuesday, November 4, 2008

Rose Dawn

Rose Dawn

This tutorial was written on July 28th 2008
Any simularity to any other tutorial is coincidental
and was written in PSP 9 but can be done in any verison

Tools needed

Scrap Kit
Template
Tube
Eyecandy 400

Template 01 here

Scrap kit by Baby Cakes Scraps PTU -Rose Dawn
HERE
No supplies for this tutorial

Open the template 01 and open paper 10
resize 75 percent and on right template circle close the star
and with magic wand click inside the circle and
selections modity expand 2
copy and paste the paper
selections invert delete paper
and open little white ring circle and click inside with magic wand
and selections modity expand 2
copy and paste your tube
and move head inside of small circle
selections invert delete
now do bottom circle same way
click on back layer raster 3 of template
magic wand click inside
selections modity expand 2
Find paper 2 resize 75 percent copy and paste as new layer..
selections invert delete
selections select none
with deformation tool pull paper down to bottom and top
Effects Tramages filter Tow line setings
control o:80 control1: 54 control 2 48 control 3: 9 apply
On template click on raster 5 with magic wand
click inside and selections modity expand 2
copy and paste paper 8 as new layer
selections invert delete
Effects Tramages same settings tow line
selections select none
give same drop shadow
V & H 4
Opacity 50
blur 4.00
color black
duplicate left panel and mirror to right side
Find butter fly 5 resize 75 percent 2 times
copy and paste as new layer
resize 75 percent place like mine
drop shadow
Find ribbon flower resize 75 percent 6 times
copy and paste as new layer
place on frame bottom and drop shadow
and duplicate and place on top frame ..
find knotted ribbon pink resize 75 percent 2 times
copy and paste as new layer
put top left panel and
find pink pearl bow and resize 75 percent 3 times
copy and paste as new layer
and place on top of knotted ribbon
drop shadow and drop shadow knotted ribbon
Find flower 2 resize 75 percent 3 times
copy and paste as new layer
and place right bottom resize 75 percent again
copy and paste your main tube
I am using Jamie Kidd
and you must have license to use her beauiful artwork
place in center of doors colorize to match
Hue 235
Sat 128
with freehand tool draw around areas you want
to colorize and give same drop shadow
Find the sparkle bow copy and paste as new lalyer
resize 75 percent 4 times place like mine
now find lace 2 resize 75 percent 3 times
and copy and paste on panels look at mine
duplicate and mirror
and duplicate and put at the bottom
and give drop shadow
and trim off what is hanging over..
Now add your name and text
Rose Dawn with color #c9588d
I used Eyecandy 4000 Gradient Glow
Glow width 4
Soft corners 25
Overall Opacity 100
Draw only outside selections checked
Color white
Click OK
Now delete all template layers
Layers merge all flatten
Image resize 85 percent
Adjust sharpen
Resize 75 percent
Thanks for doing my tutorial
Leave a finished tag on my picture album
Registered with TWInc
~ Myrtle ~

Dream Girl

Dream Girl

This tutorial was written by Myrtle on July 20th 2008
Any simularity to any other tutorial is purely coincidental
and was written in PSP 9 any verison will work

Tools needed

Scrapkit
Mask
DSB Flux Filter
Eyecandy 4000
Tube

Supplies

Mask here
Scrap Kit here

Open new canvas 600 X 600 fill with white
Open paper of choice copy and paste as new layer
Layers load from disk find your Zuzzanna mask 14
you save to psp mask folder fit to layer
source Luminace checked
hide mask checked click load and merge group
find frame DG frame 3 copy and paste as new layer
duplicate flip mirror look at mine
place none decorated end to end
and with freehand tool cut off ends
and place both frame pieces together and close off all layers
and merge visible
click inside of frame with magic wand
selections modity and expand 4
find your tube of choice .
I am using the beauiful artwork of Jennifer Janesko
and you have to have license to use her artwork
a laying down tube works better
copy and paste as new layer
selections invert delete and selections select none
move below the frame layer
Find the butterfly 3 copy and paste as new layer
resize 70 percent 3 times
drop shadow
V & H 2
Opacity 70
Blur 5.00
color black
Find flower pink 1 copy and paste as new layer
resize 3 times 70 percent
place right bottom frame same drop shadow
Find tag Dream copy and paste as new layer
resize 70 percent 3 times
drop shadow and place under the flower layer like mine
text font Harrington write below the dream tag
Girl font size 36 stroke 2 color #eb6798
convert to layer
Eyecandy 400 Gradient Glow
glow width 3
color white
soft corners 25
overall opacity 100
Draw only outside the selections checked
same drop shadow
Add your name and copyrights
give same drop shadow and gradient glow to name
close off all layers except for butterfly and flower layers
merge visible
with freehand tool go around the inside hearts on frames
go Effects DSB Flux and bright noise
entensity 38 click mix 1 time ok
now do mask layer and butterfly flower layer same
copy merge and animation shop paste as new animation
back to PSP and Edit undo Bright noise on all 3 layers.
Effects DSB Flux bright noise
and do all 2 layers same and click mix 2 times
. copy merge and animation shop paste after currnent frame
back to PSP and Edit undo bright noise on all 3 layers..
Effects DSB Flux bright noise and mix 3 times on all 3 layers ..
copy merge and animation shop paste after current frame.
resize 85 percent 3 times
view animation
if look ok save as
Thanks for doing my tutorial
Leave a finished tag on my picture album
Registered with TWInc
Myrtle

Monday, November 3, 2008

Oopsie Daisies

Oopsie Daisies

This tutorial was written by Myrtle on July 27 th 2008

Any simularity to any other tutorial is purely coincidental

and was done in PSP 9 can be done in any verison

Tools needed

Scrap Kit pieces in supplies

Tube Mask Zuzzanna_ Mask 34

Eyecandy 4000

called Oopsie Daisies


put mask in psp mask folder

and save image to psp work area

Supply paper3

Open new canvas 600 X 600 transparent

Open paper 3 copy and paste as new layer

and resize 75 percent 2 times

copy and paste as new layer..

layers load mask from disk

and find Zuzzanna_mask 34 load

merge group


with selections tool draw a line around the center of mask area

find your image and resize 3 times 75 percent

copy and paste into selections


layers new raster layer

selections select none

Find bow 1 resize 65 percent 3 times

copy and paste as new layer resize 65 percent 3 times

place top left corner

give drop shadow


V & H 4

Opacity 50

Blur 4

color black


Find Rafiaribbon

resize 65 percent 4 times

copy and paste as new layer


with deformation tool rotate top right look at mine.

Find daisy 4 resize 50 percet 2 times

copy and paste as new layer

put over the rafiaribbon

resize 50 percent and then resize 65 percent

give same drop shadow


find daisy 3

resize 4 time 60 percent and place on each side of daisy 4

, look at mine


Find butterfly 5

resize 80 percent 3 times

copy and paste as new layer

resize 60 percent 3 times

place like mine


Find beads resize 60 percent 4 times

place like mine duplicate and mirror

erase part hanging below butterfly.

give same drop shadow

duplicate place at bottom and duplice flip

look at mine


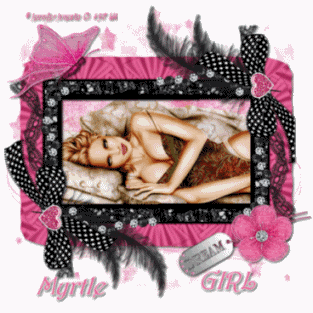
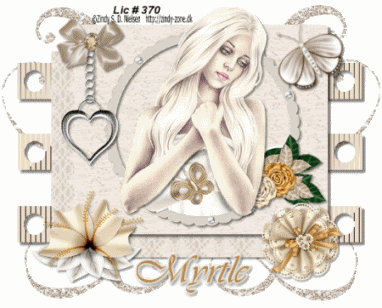
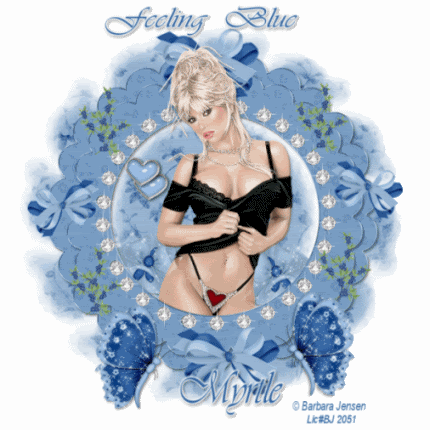
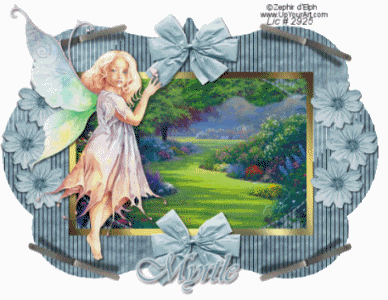
and add your tube of choice

I am using the beauiful artwork of Dave Nestler

and it is a PTU tube

to use his artwork you have to have a license

add glitter sucker 1

resize 50 percent 3 times and place right bottom

add glitter sucker 2 and resize same and place like mine on the right side,


add your name and copyright.

I used a gradient glow on my name color #781642

Eyecandy 4000


Glow width 4.00

Soft corners 25

Overall opacity 100

Draw only outside selections checked

color white give same drop shadow


add text Oopsie Daisies

put eyecandy gradient glow same as name

on text and same drop shadow

with selection tool go around center of image


layer new raster layer

and go to Effects

VDL Adrenaline snowflakes

amount 250

suze arange begin 0

size range end 6

hardness 100

transparency 0

Basic snow

random seed 0

click ok


Adjust blur

motion blur

angle 167

stength 30

selections select none

copy merge


animation shop

paste as new animation


back PSP and do this for 2 more times

hit random seed slider

then animation shop


paste after current frame

view animation

if look ok then resize 85 percent 3 times


crop extra white off.


Thanks for doing my tutorial

leave a finished tag

in my email addy below terms of use

Registered with TWInc


~Myrtle ~

Golden Creams


Golden Creams

This tutorial was written on July 30th 2008
Any simularity to any other tutoril is purely coincidental
and was written in PSP 9 any verison will work

Tools needed

Template1
Scrap kit Freebie Golden Creams
Tramages plugin filter
Tube
Eyecandy 4000
DSB Flux
Template 1 by-
HERE
it's the 5th template on the page

Scrap kit Golden Creams is a freebie from
HERE

Open the template click on back lines
with magic wand click inside
and selections modity expand 2
Find paper1 copy and paste as new layer
selections invert delete
selections select none
Effects Tramages plugin tow the line
settings below
Control 0: 80
control 1: 54
Control 2: 48
control 3: 9
click apply
give drop shadow
V & H 4
Opacity 50
Blur 4
color Black
Template click frame layer
magic wand click inside frame
layer selections modity expand 2
Find paper 13 rotate 90 degrees left
copy and paste as new lalyer
selections invert delete selections select none
Template click on top layer
magic wand click inside
selections modity expand 2
Find paper17 copy and paste as new layer
selections invert delete
selections select none
give same drop shadow
Find frame 3 from kit copy and paste as new layer
and resize 85 percent 4 times
with magic wand click inside of frame
selections modity expand 2
Find your tube
I am using the beauiful artwork of Zindy Nielsen
an it is a PTU tube
and you have to have license to use her artwork.
if you are using same tube I used resize 80 percent 3 times
and copy and paste as new layer
placel like mine
selections invert delete
copy and paste your tube again over that tube
and give drop shadow except change H & V 2
with freehand tool trace around arms
and delete that part hanging over frame look at mine
Find flower 1 resize 4 times 80 percent
copy and paste as new layer
place bottom left of template frame..
Find heart charm resize 65 percent 3 times
place upper left corner of top layer
and with freehand tool go around bow
and delete selections select none
Find bow 3 resize 65 percent 3 times
and placl at top of heartcharm chain
give same drop shadow to bow and heart charm
Find flower4 resize 65 percent
copy and paste as new layer
place left bottom corn give drop shadow
Find doodle 4 resize75 percent
copy and paste as new layer
and place below raster 1
and duplicate and mirror look at mine
find butterfly 4 resize 75 percent 5 times
copy and paste as new layer
Place right top with deformation tool angle
and drop shadow
now delete all template layers
and merge doodle layers visible
now add your name and copyrights
use font of choice
and eyecandy 4000 gradient glow on name
I used color #b98a4f
Eyecandy gradient glow
Glow width 4
Soft corners 25
Overall opacity 100
Draw only outside selection checked
Color white
click OK
Now ready for animation
On doodle layer
Effects DSB Flux Bright noise
Intensity 35
mix 1 time
click OK
copy merge
Animation shop paste as new animation
back to PSP
Edit undo bright noise
Effects DSB Flux Bright noise mix 2 times
click OK
copy merge animation shop paste after current frame
back PSP and edit undo bright noise
Effects DSB Flux Bright noise mix 3 times
click OK
copy merge animation shop paste after current frame
click view and if look ok
resize 85 percent 3 times
and save as
Thanks for doing my tutorial
Leave a finished tag on my picture album
This tutorial is registered with TWInc
~Myrtle ~

Saturday, November 1, 2008

Feeling Blue


Feeling Blue

This tutorial was written by Myrtle on Aug.4th 2008
Any simularity to any other tutorial is purely coincidental
and was written in PSP 9 can be done in any verison

Tools needed
Scrap Kit
Mask
Eyecandy 4000
Alien Skin plugin
Tube

Scrap Kit by Frosted Illusions a PTU kit
and can't Link share was given by the scrap kit
site for doing tutorial

HERE

Mask from wee scots lass creations

HERE

save mask to PSP mask folder
WSL_Mask 203

The diamond I used HERE


Open new canvas 700 X 700 transparent fill with white
Open paper 9 copy and paste as new layer
Layers Load/save mask load mask WSL_Mask 203
fit to layer checked source luminace checked hide all mask checked
click load
layer click on mask and delete say yes merge group
Find frame 4 copy and paste as new layer
resize 85 percent duplicate
rezize 80 percent give drop shadow
V&H 2
Opacity 40
Blur 5
color Black
give drop shadow on both frames
with magic wand click inside of top frame
selections modity expand 4
Find your tube of choice
I am using the beauiful artwork of Barbara Jensen
and to use her artwork you have to have a license
copy and paste tube as new layer
selections invert delete selections select none
pull tube below frame
copy and paste tube again as new layer
give drop shadow and place over with freehand tool
trim over hanging on frame of tube
delete and selections select none
add what elements of choice
and place a diamond in each hole on frame
and close off all layers except for the diamonds
and merge visible
Find blossom 1 resize 70 percent 3 times
copy and paste as new layer
resize 50 percent
place on frame like mine
drop shadow duplicate image mirror
Find butterfly 5 resize 70 percent 2 times
and place like mine drop shadow
duplicate give drop shadow
Find double bow 1 image resize 70 percent 2 times
copy and paste as new layer
place under diamond layer duplicate mirror
Find bead heart charm resize 70 percent 3 times
with freehand tool circle beaded tear delete
selections select none
place heart like mine and duplicate drop shadow
close all layers except flower layer behind tube
merge visible
Open all layers back
add name and copy rights
font of choice and color # 3b6ca9
I used Eyecandy 4000 gradient glow
on my name and text writing
Glow width 4.00
Soft corners 25
Overall opacity 100
draw only outside selections checked
click ok and give drop shadow
close all layers except butterfly
merge visible
unclose all layers
Now ready for animation
Select butterfly layer
Effects Alien Skin Xenofex2 constellation
Star size 2 22 6 4 100 75 twinkle rotation 45
keep original image checked
click ok
do same effects on flower layer click ok..
copy merge animation shop paste as new animation
back to PSP
Edit undo constellation on butterfly adn flower layers
Effects alien skin xenofex 2 constellation
same settings click random seed 1 time click ok
copy merge animation shop paste after current frame
back to PSP
Edit undo constellation on both layers
Effects alien skin xenofex2
butterfly layer click random seed
and do flower layer same way and click ok
copy merge animation shop paste after current frame
view animation
and if look ok resize and save as
Thanks for doing my tutorial
leave a finished tag on my picture album
Registered with TWInc

~ Myrtle ~


Summer Storm


Summer Storm

This tutorial was written by Myrtle on August 10th 2008
Any simularity to any other tutorial is purely coincidental
and was written in PSP 9 any verison will work

Tools Needed
Scrap Kit
Tube of choice
Image
Template
Tramage plugin
Eyecandy 4000
VDL Adrenaline snowflakes

Scrap kit freebie
http://leatheo.blogspot.com/2008/08/summer-storm-freebie.html

Template 22
http://divineintentionz.blogspot.com/

Open template with magic wand click on frame
selections modity expand 4 click ok
Find your image of choice copy and paste as new layer
selections invert delete selections select none
Template click on shape with magic wand
selections modity expand 4
Find paper 10 from kit copy and paste as new layer
selections invert delete
selections select none
Effects Tramage plugin tow the line
Control 0: 80
Control 1: 54
Control 2: 48
Control 3: 9
click ok
Template frame with magic wand click
and fill with a gold gradient
graphic plus filter cross shadow
selections select none
add elements of choice from kit
give drop shadow to all elements
V & H 2
Opacity 70
blur 5.00
color black
click ok
add tube of choice
mine is from the beauiful artwork of UpYourArt
copy and paste as new layer
resize 7o percent 2 times
and place like mine
Find element 29
copy and paste as new layer
resize 70 percent 5 times
place like mine and duplicate 3 times
and place like mine
Add name and copyright
and give gradient glow to name
Glow width 4
Soft corners 25
Overall Opacity 100
Draw only outside selection checked
color white click ok
Give same drop shadow.
delete all template layers
Click on image layer with magic wand
click inside of frame layer
new raster layer
rename rain on raster raster
Effects V D L Adrenaline snowflakes
amount 250
size range begin 0
size range end 6
Hardness 100
Transparency 0
Basic snow
Random Seed 0
click ok
Adjust blur Motion Blur
angle 167
Strengh 30
click ok
Selections select none
copy merge Animation Shop paste as new animation
Back PSP Edit undo selection
select none on snowflakes and blur motion
Effects snowflakes move the slider to 5
Adjust Motion Blur selections select none
copy merge Animation Shop paste after current frame.
Back to PSP and edit undo snowflakes and motion blur
Effects Snowflakes move random seed slider to 10
Adjust Motion Blur click ok ..
Copy merge Animation Shop paste after current frame
View animation
if look ok resize 85 percent 2 times
save as
Thanks for doing my tutorial
leave a finished tag on my picture album
Registered with TWInc
~ Myrtle ~

Follow That Dream

Follow That Dream

This tutorial was written by Myrtle on August12th 2008
Any simularity to any other tutorial is purely coincidental
and was written in PSP 9 will work in any verison

Tools needed
Scrap Kit
5 tubes of choice
Mask
Eyecandy 4000

Scrap Kit freebie from http://bitsnpiecesofqbd.blogspot.com/
Password for the kit is THANKS all in caps ok

Mask from Becky_Mask022
HERE


save mask to PSP mask folder

Open new canvas 600 X 600 transparent fill with white
Open paper 03 copy and paste as new layer
Layers load/save mask load mask from disk
and find Becky_Mask 021 load
merge group resize 85 percent
Find torn paper 01 copy and paste as new layer
resize 85 percent 3 times
give drop shadow
V & H 2
Opacity 40
Blur 5.00
Black
Find journal 01 copy and paste as new layer
resize 85 percent give same drop shadow
Find filmstrip 02 copy and paste as new layer
resize 85 percent 2 times
With magic wand click inside of filmstrip
and copy and paste tube of choice
in filmstrip place your main tube out to side on right ..
Find bow 03 resize 75 percent copy and paste as new layer
resize 70 percent 2 times place at top
give drop shadow
Find film 01 resize 75 percent 3 times
place like mine give drop shadow
Find movie clapboard resize 75 percent
copy and paste as new layer
resize 50 percent place left bottom
resize 65 percent give drop shadow
Find bead Heartbreak Hotel resize 65 percent 2 times
place on left side
Find ribbon of choice follow that dream
resize 65 percent 3 times
place side of bead give drop shadow..
Add your name and copyrights
I used Eyecandy 4000 gradient glow on my name and text
Glow width 4
soft corners 25
Overall opacity 100
Draw only outside selections checked
Layers merge flatten all
Thanks for doing my tutorial
Leave a finished tag on my picture album
Registered with TWI nc
~ Myrtle ~