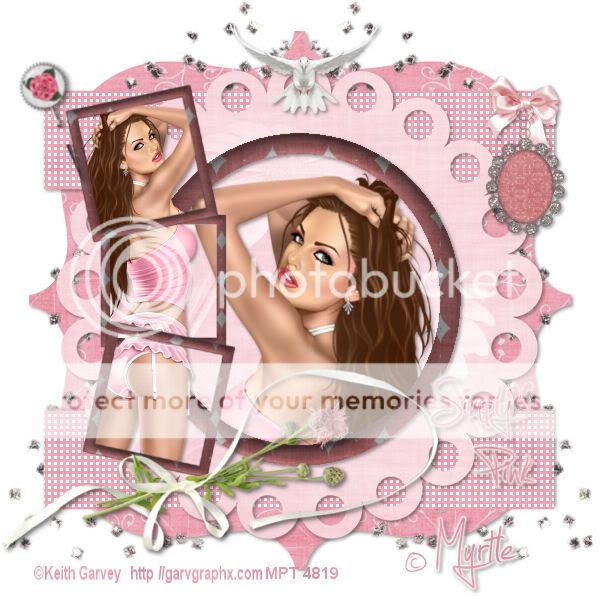
Saturday, January 29, 2011

Simply Pink

Align Center

FULL VIEW

Simply Pink

This tutorial was written by Myrtle
on Jan 30th 2011

was written in PSP 9 any verison will work
Any simularity to any other tutorial
is purely coincidental

The Ideas for this tutorial are my own

Tools Needed

Scrap Kit by Doris
Template#10
Tube

Filters
EyeCandy 4000
DSB Flux


Scrap Kit by ScrapsDimensions
HERE


Template by Doris

HERE

Tube of Choice
I am using artwork from keith Garvey
to use his artwork you need a License#

HERE

Open template#10 Duplicate
and delete Original one

Delete Copyrights Layers
Delete Be Happy text

Template #10 Click on template layer 1

Selections Select All
Float
Defloat

Scrap Kit Paper 9
Copy and Paste as New Layer
Selections Invert Delete
Selections Select None
Delete template layer 1
give Raster 1 Drop Shadow

Template#10 Click on Scalloped Layer
Selections Select All
Float
Defloat

Scrap kit Paper 1 Copy and Paste as New Layer
Resize 70 Percent
Selections Invert Delete
Selections Select None
Drop Shadow
Delete Scalloped Layer on template#10

Template#10 Click on Circle with Magic Wand

Scrap Kit Paper 3 Copy and Paste
as New Layer
Resize Paper 70 Percent
Selections Invert Delete
Selections Select None

Effects 3D Effects Inner Bevel
Settings
Bevel 1
Width 6
Smoothness 30
Depth 3
Ambence-20
Shininess 20
Angle 195
Intensity 30
Elevation 40
Color White
Click Ok
Delete temple Circle

Template#10
With Magic Wand Click Inside
Circle Selections Modifty Expand 3

Find your tube of choice
if using same tube I am
You will need a License#to use

HERE

Click on Close Up Tube
Copy and Paste as New Layer
Resize 70 Percent
Resize 80 Percent
Place like mine
Selections Invert Delete
Move under Circle Frame
Selections Select None
Drop Shadow

Template#10

Template#10 Click on Square 1
Selections Select All
Float
Defloat

Do each Square with the same paper
as Circle and Inner Bevel same
Resize Paper 3 70 Percent 2 Times
Copy and Paste as New Layer

Template#10 Click on Raster 5
Top Frame with Magic Wand
Click Inside of Frame
Selections Modify Expand 3

Find your tube Copy and Paste
as New Layer in Top Frame
Selections Invert Delete

Do other two Frames same like mine

Template#10 Click on Rectangle 1
Selections Select All
Float
Defloat

Scrap Kit Paper 7 Copy and Paste
as New Layer resize 70 Percent
Selections Select None

Effects Texture Effects Weave

Settings
Gap Size=3
Width =3
Opacity =5
Weave Color White
Gap Color White
Fill Gaps Checked
Click Ok

Duplicate Flip put on Bottom Rectangle
Drop Shadow Both Rectangles
Delete both Template #10 Rectangles

Template#10 Click on Raster 1
Scrap Kit Element scattered Glitter
Copy and Paste as New Layer
resize 80 Percent place on right
side Duplicate Mirror
Merge Down Both Layers

Scrap Kit Element Embellishment
Bow and Flower
Copy and Paste as New Layer
Resize 70 Percent Resize 80 Percent
Place like mine on Bottom of Scalloped Raster
Drop Shadow

Scrap Kit Element 2
Copy and Paste as New Layer
resize 70 Percent 2 Times
Place like mine Drop Shadow

Write your Text Simply Pink
Font of choice
Give Gradient Glow
Settings
Glow Width =3.00
Soft Corners =25
Overall Opacity =100
Draw Only Outside Selections Checked
Click Ok

Scrap Kit Element Pin
Copy and Paste as New Layer
resize 50 Percent 3 Times
70 Percent 1
Place like mine Drop Shadow

With Deformation Tool Rotate like mine

Add your Name and Copyrights
Give your name same Gradient Glow
Drop Shadow
Layer Palette Merge Flatten
Save as Gif

Thanks for doing my tutorial
Registered with TWInc

~~~~~~ Myrtle ~~~~~


Wednesday, January 19, 2011

Love


FULL VIEW


This tutorial was written by Myrtle
on Jan 19th 2011
Was written in PSP any verison will work
Any Simularity to any other tutorial
is purely Coincidental
The Ideas for this tutorial are my own

Tools Needed

Scrap Kit
Mask WSL_Mask 84
Tube
Filters
Eye Candy 4000
Alien Skin Constellations

Glitter heart and Cloud HERE

Scrap Kit Love& Hope by Jaelop Designs
HERE
Mask WSL_Mask 84
HERE
Put mask in your PSP mask folder
Tube by Keith Garvey
HERE

To use Keith Garvey artwork you need a License#

File Open New Image 600 X 600 Pixels

Scrap Kit Paper 1 Copy and Paste
as New Layer resize 80 percent 5 Times

Scrap Kit paper 11 Copy and Paste
as New Layer resize 60Percent 3 Times

Layers Load/Save Mask
Load Mask From Disk
Find WSL_Mask 84

Source Luminance Checked
Fit to Canvas Checked
Hide All Mask Checked
Load
Merge Group

Scrap Kit Element 54 Wire
Copy and Paste as New Layer
over Mask Layer
resize 60 Percent 2 Times
70 Percent 2 Times
Duplicate Image Flip Merge Down
Resize 80 Percent

Scrap Kit Element 16 Resize 70 Percent
Copy and Paste over Wire
Resize 60 Percent 2 Times

With Preshapes Find Heart Shape 1
Aniti-Alias Check
Create as Victor Checked
Line Solid Width 8.00

Draw out Heart in Color #b02029
Draw out to look like mine
Layers Convert to Raster Layer

With Magic Wand click on Frame
Selections Modifty Expand 3
Material Palette Gradient Gold
Angle 57
Repeats 3
Invert Not Checked
Styele Linear
Click Ok
Fill Frame with the Gradient Gold
Selections Select None

Magic Wand click inside of Frame
Selections Modifty Expand 3

Scrap Kit Paper 4 Copy and Paste as New Layer
Resize 60 Percent 2 Times
Selections Invert Delete
Selections Select None
Move Paper below Frame

Scrap Kit Element 29 Copy and Paste
as New Layer
Move below Heart
Resize 70 Percent 2 Times
With Deformation Tool pull out to look like mine

From the Supplies find Sparkle Heart Glitter
Copy and Paste inside of Heart like mine
Resuze 70 Percent and with Deformation
Tool pull to fit inside Heart like mine

Find your Tube of Choice
I am using artwork form Keith Garvey and to use
his artwork you need a License #
HERE
Resize Tube 80 Percent

From Supplies find the Clouds
Copy and Paste as New Layer
Over your tube like mine
With Deformations Tool pull Cloud from top and bottom
To fit like mine
Layer Palette Lower Opacity to 96 Percent

Scrap Kit Element 40 Copy and Paste
as New Layer
Resize 45 Percent 3 Times
Place like mine
With Deformation Tool Pull out around some

Give Gradient Glow
Eye Candy 4000
Gradient Glow 3.00
Soft Corners 25
Overall Opacity 100
Color White
Draw Only Outside Selections Checked

Scrap Kit Element 45 Copy and Paste
as New Layer Resize 70 Percent 5 Times

Add your name and Copyrights
Add sane Gradient Glow to Name
Click on the Sparkle Heart on
the Heart and add Sparkles

Alien Skin Constellations
Settings
2.00-1-1-0-100-75
Twinkle Rotations 45
Keep Original Image Checked
Random Seed 1
Click Ok
Copy Merged

Animation Shop
Paste as New Animation

Back PSP
Edit Undo Constellation
Effects Alien Skin Constellations
Same Setting
Click Random Seed
Click Ok
CopyMerged

Animation Shop
Paste After Currant Frame
Back PSP
Edit unod Constellations
Effects Alien Skin Constellations
Same Settings
Click Random Seed
Click Ok
CopyMerged

Animation Shop
Paste After Currant Frame

View Animation if look ok
Resize and Save As

Thanks for doing my Tutorial
Registered with TWInc

Hope you enjoyed doing my tutorial
as much as I did writing it..
~~~~~~Myrtle ~~~~~


Monday, January 17, 2011

Cupid's Love


FULL VIEW

Cupid's Love

This tutorial was written by Myrtle
on Jan 17th 2011
Was written in PSP 9 any verison will work
Any simularity to any other tutorial
is Purely Coincidental

The Ideas for this tutorial are my own

Tools Needed

Supplies

Scrap Kit All For Love Sampler
Tube
EyeCandy 4000
Alien Skin Constellation
Font Fiolex Girls

Scrap Kit by TootyPup
HERE
Tube of choice
I am using artwork from Keith Garvey
to use his artwork you need a License#
HERE

Font Fiolex Girls

HERE

Scrap Kit Open Layout1
With Magic Wand click inside of Open Frame
Selections Modifty Expand 5

Scrap Kit Paper 9
Copy and Paste as New Layer
Selections Invert Delete
Leave Selected
Find your tube of Choice Close Up
if using same tube I am
You will need a License# to use
the artwork from Keith Garvey

Copy and Paste Tube Resize 80 Percent
Selections Invert Delete
Selections Select None
Drop Shadow

Scrap Kit Element Ribbon 7
Copy and Paste as New Layer
resize 80 Percent
With Deformation Tool Rotate
and place over ribbons on Layout
With Freehand Tool cut parts off
on ends like mine
Duplicate and place on lower Ribbon
do same cutting on Ribbon from edge
like mine With Fiolex Girls Font
Write Text Cupid's Love
Font Size 36
Put Gradient Glow on Text
Duplicate and Place like mine

Add your name and Copy rights
On my name I used Gradient Glow

Eye Candy 4000
Settings
Gradient Glow 4.00
Soft Corners 25
Overall Opacity 100
Color White
Draw Only Outside of Selections Checked
Click Ok

Layer Palette Merge Visible
Image Add Border
8 Pixels
Color White
Magic Wand Click Inside Border

Material Palette Gradient Gold
Angle 14
Repeats 3
Style Linear
Invert Unchecked
Click Ok

Fill Border with The Gold Gradient
Selections Select None

Image Add Borders 20 Pixels
Magic Wand Click Inside Border
Find your Pattern from Supplies
and Fill with the Pattern
Selections Select None

Image Add Border 8 Pixels
Magic Wand Click inside Border
Fill with Gold Gradient Gold

Scrap Kit Element Decor 2
Copy and Paste as New Layer
Resize 70 Percent
Place over one on Layout
Resize to fit over nicely

Effects Alien Skin Constellation
Settings
2.00-1-1-1-100-75
Twinkle Rotation 45
Keep Original Image Checked
Random Seed 1
Click Ok

Copy Merged
Animation Shop
Paste as New Animation

Back to PSP
Edit Undo Constellation

Effects Alien Skin Constellations
Same Settings
Click Random Seed
Click Ok

CopyMerged

Animation Shop
Paste After Currant Frame

Back PSP
Edit Undo Constellations
Effects Alien Skin Constellations
Same Settings
Click Random Seed
Click Ok
CopyMerged


Animation Shop
Paste After Currant Frame
Resize 80 Percent 2 Times
View Animations
If look ok Save As

Thanks for doing my tutorial
Registered With TWInc

Hope you enjoyed doing my tutorial
as much as I did writing it

~~~~~~~ Myrtle ~~~~~~~


Friday, January 14, 2011

Valentine Love 2


FULL VIEW

This tutorial was written by Myrtle
on Jan 16th 2011
Was written in PSP 9
Any verison will work

Any simularity to any other tutorial
is purely coincidental

The Ideas for this tutorial are my own

Tools Needed

Tube
Scrap Kit
Mask WSL_Mask 84
EyeCandy 4000

Supplies
Animated Flame
save to your animation shop

Scrap Kit by FantrasyMoments

Here

Mask WSLMask 84
HERE

Tube of Choice
I am using artwork from Barbara Jensen

HERE

File Open New Image
650 X 650 Pixels
Transparent Checked
Click Ok

Scrap Kit Element 74 Copy and Paste
as New Layer
Resize 80 Percent 2 Times

With Magic Wand Click Inside Frame
Selections Modifty Expand 5

Scrap Kit Paper 26
Copy and Paste as New Layer
Resize 80 Percent
Selections Invert Delete
Move Paper below Frame Leave Selected

Find your tube of choice
I am using artwork of Barbara Jensen E Package
to use her artwork you need a License# to use
HERE

Copy and Paste as New Layer
Selections Invert Delete
Selections Select None
Effects Drop Shadow of Choice

Scrap Kit Element 72
Copy and Paste a New Layer

Click on Paper behind Tube
and close tube on Layer Pallete
Paste Element as New Layer
Resize 80 Percent 2 times

With Freehand Tool go around Bow
Selections Invert Delete
Selections Select None Move Down
Drop Shadow
Layer Palette uncheck tube
Move Element up behind tube

Click on Background Layer
Scrap Kit Paper 28
Copy and Paste as New Layer

Layers Load,Save Mask
Load Mask from Disk
Find Mask WSL_Mask 84

Source Luminance Checked
Fit to Canvas Checked
Hide All Mask Checked
Click Load
Merge Group

Click on Background Layers New Raster Layer
Fill with Color White
Move to Bottom of Layer Palette

Click On Frame Drop Shadow

Scrap Kit Element 3
Copy and Paste as New Layer
Image Resize 80 Percent 3 Times
Image Rotate Free Rotate Right 90 Degrees
Click Ok
Image Flip
Place on right side of Frame
Deformation Tool Rotate until
Look like mine Drop Shadow

Scrap Kit Element 69 Candle
Copy and Paste as New Layer
Resize 70 Percent 3 Times
Image Mirror Place like mine

Scrap Kit Element 57
Copy and Paste as New Layer
Image Resize 70 Percent and 75 Percent Resize 60 Percent
Place like mine Drop Shadow

Add Text at Top Valentine Love
I used Fiolex Girls Font Size 36
Use DaFont Search for the font
Layers Convert to Raster Layer

Effects Eye Candy 4000
Gradient Glow
Settings

Glow Width 4.00
Soft Corners 25
Overall Opacity 100
Draw Only Outside Selections Checked
Click Ok
Drop Shadow

Add your name and Copyrights
Add Gradient Glow to your name
Same Settings as before

Now ready to Animate
CopyMerged

Animation Shop
Paste as New Animation
Paste 9 more times until 10 frames

Now find your animated Flame
From the Supplies

Edit Select All on Flame
Edit on Frames Select All

Back to Flame put cusor on the Flame
Drag to Frames and line up
over the candle flame
very careful with cusor over flame let go of cusor
View Animation if look ok
Resize and Save AS Gif

Thanks for doing my tutorial
Registered with TWInc
Hope you enjoyed doing my tutorial as much
as I did writing it..

~~~~~~~ Myrtle ~~~~~~


Wednesday, January 12, 2011

Love Bug


FULL VIEW

This tutorial was written by Myrtle
on Jan 12th 2011
Was written in PSP 9 any verison will work

Any simularity to any other tutorial
is Purely Coincidental
The Ideas for this tutorial are my own

Tools Needed
Scrap Kit
Tube
Template#378
Filters
Eye Candy 4000
DSB Flux Bright Noise

Scrap Kit by FantasyMoments-Scraps Sweet Valentine
HERE
Template # 378 by Divineintentionz
HERE
Tube of Choice
I am using art work from Keith Garvey
To use his artwork you need a License#
HERE

Open Template#378
Click on Square 4
Selections Select All
Selections
Float
Defloat

Scrap Kit Paper 17
Copy and Paste as New Layer
Selections Invert Delete
Selections Select None
Drop Shadow of choice

Template#378
Click on Square 5 do as same as Square 4

Scrap Kit Element 75
Copy and Paste as New Layer
Resize 50 percent 3 Times
Place on corner like mine
Drop Shadow
Resize 65 Percent
Duplicate place on bottom left Square
With Deformation Tool Rotate to fit corner

Template#378 Click on Square 2
Selections Select All
Float
Defloat

Scrap Kit Paper 8
Copy and Paste as New Layer
Resize 70 Percent
Selections Invert Delete
Selections Select None
Drop Shadow

Template#378 Click on Square1
Do as same as Square 2
Adjust Sharpness Sharpen both Squares

Scrap Kit Element 48
Copy and Paste as New Layer
Resize 20 pPercent 2 Times
With Deformation Tool Stretch until fit
heart on heart 2 layer of Template#378
Duplicate Mirro4 and Place over other heart
of raster 5 of Template#378

Template#378 click on Thin Rectangle
Selections Select All
Float
Defloat
Layers New Raster Layer
Material Palette
Click on Gradient Gold
Style Linear
Angle 39
Repeats2
Invert not checked
Click Ok

Fill Rectangle with the Gold Gradient
Selections Select None
Drop Shadow

Template#378 click on Circle1
Selections Select All
Float
Defloat

Scrap Kit Paper 20
Copy and Paste as New Layer
Selections Invert Delete
Selections Select None

Effects
Eye Candy 4000
Gradient Glow
Settings
Glow Width 5.00
Soft Corners 25
Overall Opacity 100
Draw Only Outside Selections Checked
Click Ok
Drop Shadow

Template#378 click on Square 3
Selections Select All
Float
Defloat

Scrap Kit Paper 24
Copy and Paste as New Layer
Selections Invert Delete
Selections Select None

Template#378 Click on Dotted Square and Delete
Preshape Tool Rectangle
Anli-alias checked
Create as Victor Checked
Line Style Dot
Width 5.00
Draw out Rectangle like mine in Gold Gradient
Same Settings as Thin Rectangle
Give Drop Shadow

Scrap Kit Element 64
Copy and Paste as New Layer
Resize 70 Percent 2 Times
With Deformation Tool Rotate like mine
Drop Shadow

Copy and Paste your tube as new layer
If using same tube as I am use close up tube
On your Heart Shape
With Magic Wand Click Inside
Selections Modifty Expand 5

Copy and Paste your tube resize 70 Percent
Place like mine and Rotate with
Deformation Tool
Selections Invert Delete
Drop Shadow

Bring up your tube again
Copy and Paste the whole tube as New Layer
Resize 85 Percent and place like mine
Drop Shadow

Scrap Kit Element 73
Copy and Paste as New Layer
Resize 50 Percent 2 Times
Place like mine
Drop Shadow

Template#378 on raster 9 Write Text
in a Valentine Font
I used Fiolex Girls from DaFonts Search
Write Love Bug like mine

Scrap Kit Element 71
Copy and Paste as New Layer Resize 50 Percent 2 Times
60Percent 1 Time place like mine
Drop Shadow

Scrap Kit Element 2
Copy and Paste as New Layer
Resize 50 Percent 2 times
With Deformation Tool place like mine
Drop Shadow

Scrap Kit Element 37
Copy and Paste as New Layer
Resize 50 Percent 2 Times
place like mine
Drop Shadow

Add your name and copyrights
Use Gradient Glow on Name
Same Settings as before

Ready to Animate

On whole tube if you are using
same tube as I am
With Freehand Tool go around the wings

Effects
DSB Flux Bright Noise
Settings
Intensity 34
Mix Click 1 Time
Click Ok

Copy Merge
Animation Shop
Paste as New Animation

Back PSP Edit Undo Selections
Undo Bright Noise

Effects
DSB Flux Bright Noise
Same Settings Click Mix 2 Times
Click Ok

Copy Merge
Animation Shop
Paste After Currant Frame

Back PSP Edit Undo Selections
Undo Bright Noise

Effects DSB Bright Noise
Same Settings Click Mix 3 Times
CopyMerge
Animation Shop
Paste After Currant Frame
View Animation If look ok
Resize and Save As

Thanks for doing my tutorial
Registered with TWInc
Hope you enjoyed doing my tutorial
as much as I did writing it..
~~~~ Myrtle~~~~


Monday, January 10, 2011

Crazy Love


FULL VIEW


This tutorial was written on Jan 10 2011
Was written by Myrtle

Was written in PSP 9 any verison will work

Any simularity to any other tutorial
is purely coincidental

The Ideas for this tutorial are my own

Tools Needed
Tube
Scrap Kit
Mask WSL_Mask 84

Plugin Filters
Eyecandy 4000
DSB Flux Bright Noise

Scrap Kit by Cinnomon Scraps Crazy Love

HERE

Mask WSL_Mask 84 by weescotslasscreations

HERE
Put WSL_Mask 84 in your psp mask folder

Tube of Choice
I am using artwork by Keith Garvey
to use his artwork you will need a License#

HERE

Lets get started
File Open New Image 650X650 Pixels
Click Ok

Scrap Kit paper 12 Copy and Paste
as new layer

Layers Load/Save Mask
Load Mask from Disk
Look for WSL_Mask 84

Source Luminance Checked
Fit to Canvas Checked
Hide all Mask Checked
Click Load
Merge Group

Scrap Kit Heart Frame 2
Copy and Paste as New Layer
Resize 80 percent
Magic Wand Click Inside Frame
Selections Modifty Expand 5
Click Ok

Scrap Kit Paper 8
Resize 80 Percent
Copy and Paste as New Layer
Selections Invert Delete
Move below Frame
Selections Select None

Find your tube of choice
I am using artwork of Keith Garvey
to use his artwork you need a License #

HERE

With Magic Wand click inside of Frame
Selections Modifty Expand 5
Copy and Paste your tube
Selections Invert Delete
Selections Select None

Copy and Paste tube again over other one
Drop Shadow of choice
Layer Palette Lower Opacity to 72 Percent
With Freehand Toll trim part of tube hanging
over frame
Selections Invert Delete
Put Layer Opacity back to 100 percent

Click on Frame
Effects
EyeCandy 4000 Gradient Glow

Settings

Glow Width 6.00
Soft Corners 25
Overall Opacity 100
Draw Only Outside Selections Checked
Click Ok

Scrap Kit Element Cherry Blossom 3
Copy and Paste as New Layer
Resize 80 Percent with Deformation Tool
Rotate some like mine
Give Same Gradient Glow
Duplicate Mirror

Scrap Kit
Element _Gitt Rose
Copy and Paste as New Layer
Resize 70 Percent 80 Percent
place like mine
With Deformation Tool cut off ends
of branches under Rose
Give Rose Drop Shadow

Scrap kit Element Bow 10
resize 70 Percent Copy and Paste
as New Layer
With Deformation Tool Rotate like mine
Move below Rose
Put same Gradient Glow on Bow

Click on Background Layer and Fill with Color White

Scrap Kit Element Love Charm1
Copy and Paste as New Layer
Resize 70 Percent 2 times
place like mine

Scrap Kit Element Butterfly 7
Copy and Paste as New Layer
Resize 70 percent 4 Times
Place like mine Drop Shadow
Duplicate Mirror
Place like mine
Drop Shadow both Butterflies

Scrap Kit Element Red Flower
Copy and Paste as New Layer
Resize 70 Percent 2 times
Place like mine

With Scrip Font write out
Crazy Love and place like mine
Drop Shadow

Add your name and copyrights
Use same Gradient Glow on your Name

Click on Heart Background Heart Frame

Effects DSB Flux Bright Noise

Settings
DSB Flux Bright Noise
Intensity 34
Click Mix 1 Time
Click Ok
CopyMerge

Animation Shop
Paste as New Animation


Back PSP Edit Undo Bright Noise
Same Settings
Click Mix 2 Times
Click Ok
CopyMerge

Animation Shop
Paste After Currant Frame

Back PSP Edit Undo Bright Noise
Effects DSB Flux Bright Noise
Same Settings
Click Mix 3 Times
Copy Merge

Paste After Currant Frame

Click View Animation if look ok
Save As

Thanks for doing my tutorial
Registered with TWInc
Hope you enjoyed doing my tutorial as much as I did

~~~~~ Myrtle~~~~~


Sunday, January 2, 2011

Blue Ice


This tutorial was written by Myrtle on Jan 2 nd 2011

And was written in


PSP 9 Any verison will work

Any simularity to any other tutorial is Purely Coincidental

The Ideas for this tutorial are my own Do not claim as your own

Tools Needed

Tube of Choice

Mask WSL_Mask 84

Filter Plugins Alien Skin Xenofex2 Constellation

Eyecandy 4000

Supplies


Frozen_Lake tube GH Four in One Bead Border HERE

Bell Pattern HERE


Am-Bead Corners HERE


Mask WSL_Mask 84 by weescotslasscreations


Put WSL_Mask in your PSP mask Folder


Open all supplies on workspace


Tube of Choice or the one I have in the supplies FTU Tube HERE


File New Image Pixel Width 500 Pixel Height 600 Transparent

Checked Click Ok


From your tube pick a light and dark color

Click on Foreground color go to Gradient Click on Foreground/Background


Style Radial Angle94

Repeats8 Invert Checked Horizontal 50 Vertical 50 Click Ok

Fill your Image with the Gradient


Layers New Raster Layer

Fill with Color #b8cbd7

Layers Load/Save Mask WSL_Mask 84

Source Luminance Checked

Fit to Canvas Checked

Hide All Mask Checked Click

Load Merge Group


Find your tube of choice or use mine

Copy and Paste as New Raster Layer

Resize 80 Percent Give Mask Layer Drop Shadow of Choice


On Mask Layer


Effects Alien Skin Xenofex2 Constellation

Settings 2.00 1 1 1 100 75

Keep Original Image Checked

Random Seed 1

Click Ok

From Supplies find Pearl Corners

Resize 80 Percent

Copy and Paste as New Raster Layer


Layer Palette Duplicate

Mirror Duplicate Flip Duplicate Mirror

Find Bead Frame

Copy and Paste as New Raster Layer

on Outside of Corners


Add Your Name and Copyrights

use Gradient Glow on Name

Resize copyrights 80 Percent 2 times


Gradient Glow Settings

EyeCandy 4000 Glow Width 3.00

Soft Corners 25

Overall Opacity 100

Draw Only Outside Selections Checked

Click Ok


Layer Palette Merge All Flatten

Image Add Borders 4 Pixels

Color#b3c5d1

Click Ok


Image Add Borders Pixels 20 White

Magic Wand Click Inside

Layer Palette Click Foreground color

then Pattern


Find Bell Pattern

Angle 0 Scale 100

Click Ok


Tool Palette Click on Paint Bucket

Click Pattern

Fill Selection with Pattern

Leave Selected


Effects 3 D Effects Inner Bevel

Settings


Bevel 2

Width 2

Depth 41

Smoothness 20

Ambence 42

Shininess 53

Angle 325

Color White

Intensity 50

Elevation 21

Click Ok


Selections Select None

Image Add Border Pixels 4

Same Color as Before

Image Add Borders 3 Pixels

Color#dee2d7

Click Ok


Resize and Save As


Thanks for doing my tutorial

Hope you enjoyed doing my tutorial as I did writing it

Registered with TWInc


~~~~~~ Myrtle ~~~~~~